


Connecting a box type scroll chiller to a cooling tower is a crucial process in many industrial and commercial cooling systems. As a supplier of box type scroll chillers, I understand the importance of getting this connection right to ensure optimal performance and efficiency. In this blog post, I'll guide you through the step - by - step process of connecting a box type scroll chiller to a cooling tower.
Understanding the Basics
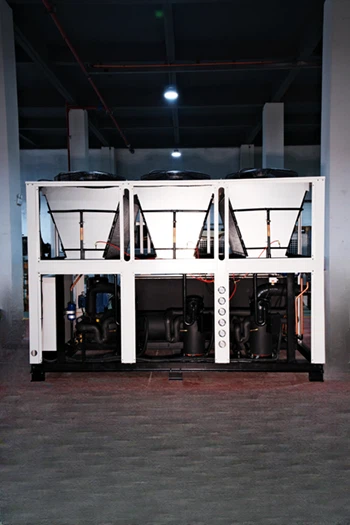
Before we start the connection process, it's essential to understand the basic functions of a box type scroll chiller and a cooling tower. A Box Type Air Cooled Screw or Scroll Water Chiller is a compact and efficient cooling device that uses a scroll compressor to cool water. It is often used in applications where space is limited and a reliable cooling solution is required. On the other hand, a cooling tower is a heat rejection device that extracts waste heat from the chiller and transfers it to the atmosphere.
A Box Type Water Cooled Screw or Scroll Chiller is designed to work in conjunction with a cooling tower. The chiller cools the process water, and the cooling tower then cools the condenser water that removes heat from the chiller's condenser.
Step 1: Site Preparation
The first step in connecting the chiller to the cooling tower is to prepare the installation site. Make sure that both the chiller and the cooling tower are placed on a flat, level surface that can support their weight. The site should also have adequate ventilation to prevent overheating.
Measure the distance between the chiller and the cooling tower. This will help you determine the length of the piping required for the connection. Ensure that there are no obstacles in the path of the piping, and that the area is accessible for maintenance.
Step 2: Piping Installation
The next step is to install the piping between the chiller and the cooling tower. You will need two sets of pipes: one for the supply of water from the cooling tower to the chiller's condenser, and another for the return of heated water from the chiller's condenser to the cooling tower.
Use high - quality pipes that are suitable for the pressure and temperature requirements of the system. PVC pipes are commonly used for low - pressure applications, while steel pipes are more suitable for high - pressure systems.
When installing the pipes, make sure to follow the manufacturer's instructions. Use proper fittings and connectors to ensure a leak - free connection. You may also need to install valves, such as isolation valves and check valves, to control the flow of water and prevent backflow.
Step 3: Electrical Connection
Proper electrical connection is crucial for the safe and efficient operation of the chiller and the cooling tower. First, make sure that the electrical supply is compatible with the requirements of both devices. Check the voltage, frequency, and phase of the power source.
Connect the chiller and the cooling tower to the electrical panel using appropriate wiring. Use wire sizes that can handle the electrical load of the equipment. Install circuit breakers and fuses to protect the system from electrical overloads.
It's also important to ground both the chiller and the cooling tower to prevent electrical shocks. Follow the electrical codes and standards in your area to ensure a safe installation.
Step 4: Water Treatment
Water treatment is an important aspect of connecting a chiller to a cooling tower. The water in the system can contain impurities such as dirt, scale, and bacteria, which can reduce the efficiency of the chiller and cause damage to the equipment.
Install a water treatment system, such as a water softener or a chemical treatment system, to remove impurities from the water. This will help prevent scale buildup in the pipes and the chiller's condenser, and also inhibit the growth of bacteria.
Regularly test the water quality and adjust the water treatment system as needed. This will ensure that the water in the system remains clean and free of contaminants.
Step 5: Commissioning and Testing
Once the piping, electrical connections, and water treatment system are installed, it's time to commission and test the system. Start by filling the system with water. Check for any leaks in the pipes and fittings.

Turn on the cooling tower and the chiller. Monitor the system for a few hours to ensure that it is operating properly. Check the water flow rates, temperatures, and pressures. Make any necessary adjustments to the system to optimize its performance.
Test the safety features of the system, such as the high - pressure and low - pressure switches, and the temperature sensors. This will ensure that the system shuts down safely in case of any malfunctions.

The Role of Modular Machines
In some cases, Modular Machine can be a great option when connecting a box type scroll chiller to a cooling tower. Modular machines offer flexibility in terms of capacity and installation. They can be easily expanded or modified to meet the changing cooling requirements of a facility.
When using modular machines, the connection process is similar to that of a traditional chiller. However, modular machines often come with pre - fabricated components and standardized interfaces, which can simplify the installation process.
Maintenance Considerations
Regular maintenance is essential to keep the chiller and the cooling tower operating efficiently. Inspect the pipes and fittings for leaks and corrosion on a regular basis. Clean the cooling tower to remove dirt and debris that can block the water flow.
Change the filters in the chiller and the water treatment system as recommended by the manufacturer. Check the compressor, fans, and pumps for proper operation. Lubricate the moving parts as needed.
By following a regular maintenance schedule, you can extend the lifespan of the equipment and prevent costly breakdowns.
Conclusion
Connecting a box type scroll chiller to a cooling tower is a complex but essential process. By following the steps outlined in this blog post, you can ensure a successful installation and optimal performance of your cooling system.
If you're in the market for a box type scroll chiller or need more information on connecting it to a cooling tower, don't hesitate to reach out. Our team of experts is ready to assist you with your cooling needs and guide you through the entire process, from selection to installation and maintenance. Contact us to start a procurement discussion and find the best solution for your specific requirements.
References
- ASHRAE Handbook - HVAC Systems and Equipment. American Society of Heating, Refrigerating and Air - Conditioning Engineers.
- Cooling Tower Institute Standards and Guidelines. Cooling Tower Institute.
- Manufacturer's Installation and Operation Manuals for Box Type Scroll Chillers and Cooling Towers.


